Monday, August 31, 2009

Surprises in Furry packages


"Jan Tink" has this great video tutorial on her blog...it is so amazing! But, I am going to do a class (not using these stamps, I will make another sample) Don't look too close cuz you will see lots of booboos...eesh! Jan has a great sense of color and style and HUMOR! So be sure to check out her blog and read all the stories she shares on her blog!
I added a bee to the front... on the Really Rust Cardstock .....

You open it up and look what peeps out! Can you see the possibilities?


I used Chocolate chip, Really Rust, Summer sun and Garden Green, and the set Just Buzzin' By...


I got a super surprise on Saturday, and it was so fun to open my box of goodies! I was greeting by this Cheerful bear, and the Bermuda Bay Polka dotted ribbon! To my utter surprise, my little dog, Suki, decided that she wanted to see the bear...of course, she has her pink piggie toy that has the squeaker inside, but no, she didn't want that..she wanted my BEAR!


Now, this is the tame photo of her greeting my bear!


Today is the LAST day of August...

don't forget that also it is the last day to sign up for only 85.00 to be a demonstrator! You can't pass up this bargain!!!


Thank you for visiting my blog!
All stamps, paper and inks used are © Stampin' Up!®
For more Stampin' Up!® information, go to www.stampinup.com or Order on my Website --> www.dianneshiozaki.stampinup.net
Join My Team! password: faithfulstamper
Stay tuned for specials!

Sunday, August 30, 2009

Surfin' Bear


To make the pop up mechanism.....
Take a strip of cardstock. This one is 1/2" wide by 3"


Fold the strip in 1/2


Fold the edges in to the center.
See the card posted on yesterday's blog entry...


Yesterday, I showed you how to make this Surfin' Card...but, this is the front of the card. For some crazy reason, I couldn't get it to post the right way.....so you can see here that it is very easy to do.

I did cut out the bear, and part of the head, almost decapitating it..(ok gross)...but that way, he could tuck his surfboard under his chin. The waves were stamped in Bermuda Bay and then sponged. I layered it on Crushed Curry, and then added some mustard brads. The background on the Bermuda bay was stamped with the waves with Bermuda Bay Classic ink


Thank you for visiting my blog!
All stamps, paper and inks used are © Stampin' Up!®
For more Stampin' Up!® information, go to www.stampinup.com or Order on my Website --> www.dianneshiozaki.stampinup.net
Join My Team! password: faithfulstamper
Stay tuned for specials!

Saturday, August 29, 2009

Christmas Stamp A Stack and Surfin' Bear!


Today was fun...we did our FIRST Christmas Stamp a STACK! So, I had a group furiously making cards!


As we were talking about fun cards....We started talking about bears because my friend Julie, sent me a Build a Bear! It was such a wonderful surprise! I loved the little apron, and then funniest part, was my dog, who wanted to play with it (hey, she's a puppy! lol)... So I talked about making a surfin' bear!..
I stamped the waves, and place that one the back side of the card.


To make it pop up, you make a device by folding a strip of cardstock into 4ths. Place adhesive on 3 of the flaps to adhere it to the card


The surfboard is cut on the back side (see the first photo) and the the bear is placed on the pop up mechanism


You can see how it is attached here.


The bear attached, and riding the waves!
I got the idea from Robyn Messenheimer

I was having technical difficulties so the front of the card will be displayed when I get a chance to fix the problem (it was going up sideways!).....


Thank you for visiting my blog!
All stamps, paper and inks used are © Stampin' Up!®
For more Stampin' Up!® information, go to www.stampinup.com or Order on my Website --> www.dianneshiozaki.stampinup.net
Join My Team! password: faithfulstamper
Stay tuned for specials!

Thursday, August 27, 2009

Fun Flowers - Sweet Centers

We got this shirt for 2.00 at the Thrift Store, and the cool thing is that it is a Christian Skateboard/surfer shirt. It says Truth, Soul Armor. A group that appeals to surfers and skateboarders with a Christian foundation. The founders may have tattoos and look very radical but they have been though a lot and their walk with God reaches to these kids who are going through a lot themselves.


So, I was happy to make this find at the thrift store. We also went to a surplus store to get some khaki's so that she looks "officially" GI JOE!


Now, today, what I am showing you is a preview from the NEW Mini Occasion Catalog!

Did you get your MINI OCCASION CATALOG YET?


I stamped a few on cardstock and then took the LARGE oval punch and punched out the images. Be sure to start with the one that is farther to the left.


Then cut out the rest!


Add the petals to the center punched circle (1 3/4")


You can see the petals added and then I covered the edges with another circle punched from crushed Curry


adding candies to the center and then a shiskabob stick covered with floral tape
Voila! Finished flower!


Thank you for visiting my blog!
All stamps, paper and inks used are © Stampin' Up!®
For more Stampin' Up!® information, go to www.stampinup.com or Order on my Website --> www.dianneshiozaki.stampinup.net
Join My Team! password: faithfulstamper
Stay tuned for specials!

Wednesday, August 26, 2009

Lazy Crazy Days of Summer...


Today was a day that I describe as a lazy day of summer...
I mean...I really didn't do much today. I wasn't inspired to and it really was too hot to do much....I did take a dip in the pool, I don't call treading water, "swimming". But what we started off doing was going to a Thrift Store to do some shopping for a 1 day event my daughter has at school (PRE- high School events). She's in a group called Crazy crew and she is having a meeting on friday...before school starts (Sept 9th). The theme is GI JOE. So, we went to the thrift store to see what they might have so we don't have to spend a lot of money....We found a shirt and then we walked around...I saw a couple of wood knife blocks, and one of them was this one!!! and it looked BRAND new!....so, I decided out of curiosity to see how much this was, and.....it was....$1.51..yes you're not reading it wrong..
So, needless to say, it was whipped off the shelf and into my arms....!!!
Oh, and I will take a photo tomorrow of my GI Jane...lol


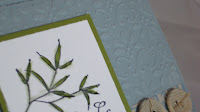
This card was done for my brother and his wife. I usually have floral, whispery, pink cards, and so trying to downplay florals, I pulled out Embrace Life. I used Bordering Blue, and Bella Bleu Designer paper.
I layered Bordering Blue cardstock after running it through the Finial Press Embossing folder, and stamped the Bamboo on the whisper white cardstock in Basic Black. I colored in the leaves with Always Artichoke and Handsome Hunter, and then ran the blender pen over the leaves and stems to "watercolor" it.
The corderoy buttons were laid down and tied with Linen thread....

Thank you for visiting my blog!
All stamps, paper and inks used are © Stampin' Up!®
For more Stampin' Up!® information, go to www.stampinup.com or Order on my Website --> www.dianneshiozaki.stampinup.net
Join My Team! password: faithfulstamper
Stay tuned for specials!

Tuesday, August 25, 2009

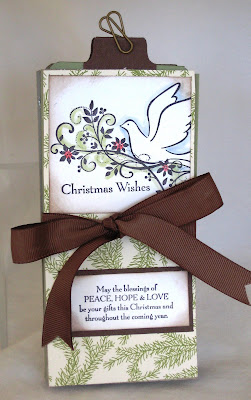
Christmas card Greeting


My Co-worker received a card for her birthday, that was made by her niece. It was such a cool idea, since it had photos of her nieces' kids. Each of the "pages" had photos and then tags that pulled out that had MORE photos on them. They also had nice Birthday phrases on each of the pages.

Well, I was working on Christmas cards, so I had Christmas papers and stamps out.


The cover is stamped with Gifts of Christmas #115372. I stamped it in basic black and then using the blender pens, I colored around the inked areas with Bashful Blue, Certainly Celery, and Real Red.


This is 1 sheet of 12x12 cardstock, scored at 3" and then folded in 1/2 the other way. As you fold this, it forms the pockets. I used the 1" circle punch to help ease the tabs so you can pull out the tags.


I mounted photos of my family on the tags, but you can see that there is lots of space for photos and things that go on throughout the year. It could be a gift-and-card-in-one!
Thank you for visiting my blog!
All stamps, paper and inks used are © Stampin' Up!®
For more Stampin' Up!® information, go to www.stampinup.com or Order on my Website --> www.dianneshiozaki.stampinup.net
Join My Team! password: faithfulstamper
Stay tuned for specials!

Monday, August 24, 2009

Banner Service!


PHOTO BY MARTHA STEWART!


To make this garland, follow the templates and the how-to.


Or download the alphabet from our website (Martha Stewart's) or STAMPIN' Up!'s and create your own.

No matter the occasion, you won't be at a loss for words.


Garland How-To

You'll need

medium-weight white or colored card stock,

pinking shears,

a utility knife,

silk ribbon (1/8 inch wide; you'll need about 4 yards, depending on your space),

and pushpins.


1. For a birthday banner, color-photocopy these letters onto white card stock. Or download the entire black-and-white alphabet from our website and print letters for desired words onto colored paper. To give the letters a decorative edge, cut them out with pinking shears. Stampin' Up!

2. Use a utility knife to cut two vertical slits near the top of each circle, as indicated.

Arrange letters into words on a work surface, and string together by threading ribbon through the slits.


Hang the garland in a corner or between opposite walls with pushpins.

Now..How easy is that? If Martha can do it, so can you. Stampin' Up has punches, dies that will cut the pieces and of course, Alphabet Stamps to do that for you!


Alphabets (Stampin' Up!)


Thank you for visiting my blog!
All stamps, paper and inks used are © Stampin' Up!®
For more Stampin' Up!® information, go to www.stampinup.com or Order on my Website --> www.dianneshiozaki.stampinup.net
Join My Team! password: faithfulstamper
Stay tuned for specials!

Saturday, August 22, 2009

TAGG'd! for Christmas!


I just bought this TAG die from Stampin' Up! It is a 2 part die that has a 'folder' that covers the tag. It acts like a pocket. What is so cool is that you can 'hide' a message on the tag which will be revealed after you open the pocket or pull out the tag.

The reindeer was made with punches. I punched the snowflake and covered it with Versamark ink and Heat & Emboss, and then covered with glitter. I cut apart the snowflake to make the antlers for the reindeer. and then sponged the edges of the punched lg oval, and 1/2" circle (cut in 1/2 for the ears) and the red 1/2" circle for the nose. On some of the reindeer, I punched a 1/4" black circle and cut in 1/2 (for the mouth).
The tags are folded and stamped in whisper white, and Happy Holidays from Many Merry Messages in Basic Black.
Getting Ready for Christmas...Tagg'd for Christmas!
Sizzix Two Tags #115954 $21.95

Thank you for visiting my blog!
All stamps, paper and inks used are © Stampin' Up!®
For more Stampin' Up!® information, go to www.stampinup.com or Order on my Website --> www.dianneshiozaki.stampinup.net
Join My Team! password: faithfulstamper
Stay tuned for specials!

Friday, August 21, 2009

Season of Simple Grace


Season of Simple Grace

Doesn't that say enough?
"For unto you is born this day in the city of David, a Saviour, which is Christ the Lord" Luke 2:11

Lift up the flap, and open the "doors" of th gate fold card, and you will see the reason why we celebrate the season....

Very simply stamped in Soft Suede on whisper white, and then lightly colored in using blenders and markers....


The panels both open up to have the 3 Kings and the Shepherds and the sheep peering up at Mary and Joseph and Baby Jesus...

This is a very simple pop up, using 2 thin strips of cardstock that is folded in fourths, and made to pop out as the card opens.


Very simply done!


Thank you for visiting my blog!
All stamps, paper and inks used are © Stampin' Up!®
For more Stampin' Up!® information, go to www.stampinup.com or Order on my Website --> www.dianneshiozaki.stampinup.net
Join My Team! password: faithfulstamper
Stay tuned for specials!

Thursday, August 20, 2009

Season's Greeting Bermuda Bay Style!


ha...is that a funny title? This card looks blue but it is actually a greenish color. Bermuda Bay is a lighter shade of teal, with a blue tone.

I used the Tagz die again, and I just think the little scallop edge is so cute. It does fit the Scallop circle punch PERFECTLY, so you know I will be doing something with that eventually...

The stamps are from the Two Cool Dudes set, which includes 2 snowmen and snowflake and the Seasons' Greetings is from the Many Merry Messages. If you ever need a Holiday Greeting set, this is the one!

I punched the snowflake and the tag from the Shimmery White cardstock and the bow was a tied piece of Bermuda Bay Dotted Ribbon. The snowman die is attached using the brad (to the tag) and the snowflake is attached with a glue dot (the brad was applied first)


At first glance, this color was very bright, and I wasn't sure it would work as a Christmas color, but I think when you see this one in person, maybe it might grow on you....

*smiles*!


Thank you for visiting my blog!
All stamps, paper and inks used are © Stampin' Up!®
For more Stampin' Up!® information, go to www.stampinup.com or Order on my Website --> www.dianneshiozaki.stampinup.net
Join My Team! password: faithfulstamper
Stay tuned for specials!

Wednesday, August 19, 2009

More Soft Suede Christmas Cards


I bought this stamp set when it came out last year and never used it (GASP!) but, I really wasn't happy using it with some of the previous papers and colors that I had last year. This year, with Real red and Soft Suede, I think I finally have hit a nice combination. The soft suede gives a bronzy appearance.
The papers in the NEW papers from the Mini catalog are so perfect for this set! This paper is called Christmas Cocoa. The papers are assorted different 2 sided papers, and 2 of the papers are flocked! This is something different from Stampin' Up! I will be featuring more from this package in the future.
I used 2 way glue and glitter in the center of the flowers, in a champagne color. The color almost matches the Soft Suede ink!


I punched a hole using the 1/2" circle punch and then pressed the White Jumbo Eyelet prongs through the hole and then pressed them to the outside (underside of the paper).
The bow was tied and glued to the center of the Eyelet


More glitter to the center of the flowers, adds more glitz!


Are you feeling Christmas yet?
ok, well, maybe just feeling more cooler...after all, it is still summer!!!


Today is my Dad's 75th Birthday...Happy Birthday DAD!


Thank you for visiting my blog!
All stamps, paper and inks used are © Stampin' Up!®
For more Stampin' Up!® information, go to www.stampinup.com or Order on my Website --> www.dianneshiozaki.stampinup.net
Join My Team! password: faithfulstamper
Stay tuned for specials!

Tuesday, August 18, 2009

Halloween Pop Up Tree

Taking a break from Christmas cards...I plug away at just having fun stamping! So..what to break the monotomy...?

Halloween is coming..!
CLOSER than Christmas! So, I thought I would get out my Halloween and get some inspiration from my stamps...

Ok, I looked at them and saw.........Nothing! AAAAHHH!!!


But then, I was checking emails and someone directed me to their blog, which they had photos of the tree cut out in the New Halloween Designer Paper!..OOH my gosh!! (Karen Burniston)
HOW Inspiring! I decided to use Black as my base for my card and then using the colors in the Designer paper, Cast A Spell #115677 $9.95

I used my Halloween stamps - Scary Skeleton, #113244, and Twick or Tweet #116497, Grateful Greetings #116511 (new in the Holiday Mini Occasion Catalog coming soon to your mailbox!) and can be ordered starting September 1st....

The colors are Black, Green Galore, Certainly celery, Orchid Opulence, and Pumpkin Pie


The Pop Up! Tree was cut in Basic Black and the Star in Pumpkin Pie. The pieces are assembled, and I stamped the skeleton on separate pieces of paper and cut out. The tombstone is the tag punch (small and large).

I layered the 2 punched pieces with dimensionals, and mounted the ghosts and the skeleton behind the punched cardstocks. They are both held onto the card using a black strip that was folded in 1/2 and then stuck down with sticky strip tape. The skeleton on the tree, and the pumpkin is adhered to the tree so that when it lays down they are flat too, and then it pops up with the tree.

What can you do with the tree? I think maybe a forest is next in a scrapbook??? So, if you're doing a camping scrapbook page, wouldn't a forest of trees be the coolest thing?


Thank you for visiting my blog!
All stamps, paper and inks used are © Stampin' Up!®
For more Stampin' Up!® information, go to www.stampinup.com or Order on my Website --> www.dianneshiozaki.stampinup.net
Join My Team! password: faithfulstamper
Stay tuned for specials!

Pinterest

Follow Me on Pinterest

Stampin Up Bloomin Bouquet

Copyright


All stamps, paper and inks used are © Stampin' Up! ® unless otherwise stated. All images, designs and words are copyright of Dianne Shiozaki, unless otherwise stated.
THIS is my personal blog, and the contents is my sole responsibility as an independent Stampin' Up! demonstrator and the use of and content of the classes, services, personal opinions or products offered on my personal blog is not endorsed by Stampin' Up!
~~~~~~~~~~~~~~~~~~~~~~~~~~~~~~~~~~~~~~~~
Feel free to copy any design for your own personal use, but please do not use my designs to submit work for publication or contests. I give credit to whose work I case, so please do the same. Plus, it is just not nice to take credit when you were not the one to think of the idea!


Daily Bible Verse

Quotes by Dr. Suess