Wednesday, December 31, 2008

Happy NEW YEAR!


I was shopping in Rite Aid, and I came across a small mesh baggie of these little chocolate roses (for a 1.00!) I thought they might make a cute project without involving 4.00 worth of m&m's to fill each person's tube. The tubes can be made bigger or smaller of course, but I like this size tube.

The top and base was done in Riding Hood Red, and the insert was done with Pink Pirouette and Kiwi Kiss. I stamped the stem and leaves in Kiwi Kiss, and then Love you from Short & Sweet (pg 146) in Black ink


The rose was attached with Mono (which I should've used sticky tape) it was coming loose, so I had to take a photo quick before it came off! I can't fix it because I used the sticky tape for the top and bottom (very important to use the sticky tape since it holds up better. If you had m&m's in this, it would be too heavy for Mono to hold all them inside! (can you imagine this spilling out! NOT!)


I used the Scallop circle 2 die cut (the smaller one) and then punched a 1 3/8 circle for the center. I needed to punch the center for the ribbon.

The back of the insert was stamped on Pink Pirouette in Riding Hood Red, using the heart and the Love you from the Short & Sweet set (146, 15.95)
I can also see a sucker inside this or...maybe if you wanted to give someone a cute pen...with a doodad on top! You can make it taller to fit inside!
Happy New Year! Be safe and celebrate "Fine in OH-Nine!"


All stamps, paper and inks used are © Stampin' Up!® All images, designs and words are copyright of Dianne Shiozaki unless otherwise stated. Feel free to copy any design for your own personal use, but please do not use my designs to submit work for publication or contests.
For more Stampin' Up!® information, go to www.stampinup.com or www.dianneshiozaki.stampinup.net

Monday, December 29, 2008

With a Cherry on Top!

If you know me, you know that I love Cherries....

Love Cherries....oh, I should put in a photo of a gift I got for Christmas! It was from my friend Valerie. She gave me the cutest Cherry gift!

Anyways....this card uses the NEW HOSTESS set coming up..(level 3). It is so cute, and has so many cute stamps...not just cherries!

What I did first was stamp the white cardstock with the cherries. Then, I stamped the 1 cherry on the other piece of cardstock. I masked the cherry, and then stamped the ice cream .....I also used the Liquid Applique to make the whipped cream look puffy!


Doesn't it look like whipped cream? YUM!!

You will want to earn this set for FREE with a 500.00 order...!!!


All stamps, paper and inks used are © Stampin' Up!® All images, designs and words are copyright of Dianne Shiozaki unless otherwise stated. Feel free to copy any design for your own personal use, but please do not use my designs to submit work for publication or contests.
For more Stampin' Up!® information, go to www.stampinup.com or www.dianneshiozaki.stampinup.net

Sunday, December 28, 2008

Valentine's Day Treat using the Sizzix


I was in SEPHORA..yes, I braved the mall today! GOSH what a nightmare! I can't believe I almost got away with no shopping in the mall during the Holidays!

Anyways..I went to Sephora, and saw this cute little treat...picked it up and thought, I can do this!!! lol


Of course, it wasn't for Valentine's...it was for Christmas!


As I was driving home, I thought I might be able to use the bottoms of the basket die. So, I cut 2 of them, and punched a hole in the center of one of them.


I cut a piece of Acetate, 6 1/4" x 5" tall
ACETATE SHEETS are available at http://www.kellypaper.com/ They are cover weight sheets for reports. (8 1/2 x 11)

I placed a piece of sticky tape on one side (5" long) The piece will make a cylinder approx 6" in circumference. (I did not ask my daughter for the information...! but, if you have a math whiz, you might get a better measurement) The cylinder will flex as you place the top/bottom on.

Bend the bottom so it will fold over the edges of the tube.


I cut a strip of cardstock 1" x 6 1/4". It just barely fits with NO overlap. I used the scallop border punch, and then sticky tape along the edge (non scalloped edge)
If you find it easier, make it overlap and cut your strip 6 1/2" instead


Wrap it around


Voila! one side done.


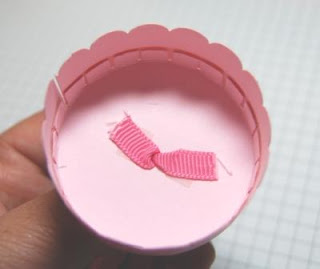
repeat with the other side, but make sure you place the ribbon through the holes as shown.


Stamp and punch this out and the hole in the center and place it over the top.


Like this!


I punched out hearts from the designer papers, and they got washed out over the m&m's...but, think of the possibilities!!!


This is all held together with STICKY tape, since it needs to be strong. You will have to rip the packaging apart to remove the candy :( but it was the strongest way to hold it...
All stamps, paper and inks used are © Stampin' Up!® All images, designs and words are copyright of Dianne Shiozaki unless otherwise stated. Feel free to copy any design for your own personal use, but please do not use my designs to submit work for publication or contests.
For more Stampin' Up!® information, go to www.stampinup.com or www.dianneshiozaki.stampinup.net

Saturday, December 27, 2008

Stamp a Stack 2008....My last one for this year!


What are you doing today? I am doing my last Stamp a Stack for 2008. The cards I do are somewhat simple cards so that they can be made quickly and easily.


This is using the Hostess set "Live Like You Mean It" in Mellow Moss, and Vanilla, and uses the Vanilla hardware! Don't you just love using the vanilla hardware? It is just gorgeous!


The ribbon is the taffeta ribbon in Mellow Moss, and the scallop borders are sponged


The 2nd card...gosh, I had a big blockage. I was just struggling this time to get 3 cards for the Stamp a Stack. It took me all day on Friday to get the last 2 planned, cut and done. I hope they are ok. The second card was a take off from one that I saw on You TUBE. If you haven't checked out You Tube for ideas, you gotta do that!


I punched the 1/2 circle using the 1 3/4" punch, and the pink pirouette cardstock is cut 4 1/4" x 5 1/2". Then it is scored so that the card ends up being 4 1/4" x 4 1/4". The excess is used for a 'flap' on the back side of the card. This way, I also got more for the card, and wasted a lot less!!!


The scallop is punched in chocolate chip, on pink pirouette, and then also on riding hood red.


Opened up, the card is ready to be sent off for a "THANKS" or Happy Valentine's Day....whatever your desire!


This last card was another one that took me a long time. I guess I am just stuck on ideas, but I have lots of this designer paper (love it!) so I needed to use some of it up! It is a trifold card, using a 4 1/4" x 11" card, and scored at 4 1/4" - 8 1/2" and then there is a flap that is approx 2 1/2".


I covered it with the Maine blueberry Designer Paper, and then punched the scallop edge. The cardstock was Not Quite Navy, and Old Olive. The flower and leaf was from Best Wishes and More.

There is a button in the center of the flower that I added a brad to cover the holes. I saw that on Patty Bennett's blog, and I really didn't like the holes in the button, so this was a great idea to cover it up!


To make the closure, I used the elastic cord, and attached it through small holes punched in the back and then covered up in the inside...(will have to put a photo of the inside later. My camera was malfunctioning due to the lack of lighting and probably an almost dead battery!)


Happy New Year....Hope you had a great Christmas, and got all your post Christmas shopping done! I didn't go anywhere...decided to stay home, and get stuff cleaned out. I did clean out a room, and threw out a bunch of stuff, plus fixed the toilet (the rubber thingy inside was broken so it wouldn't flush!) I also worked on my stamping!!! THANK God it is done for this weekend! I was really not creative....just challenged!


All stamps, paper and inks used are © Stampin' Up!® All images, designs and words are copyright of Dianne Shiozaki unless otherwise stated. Feel free to copy any design for your own personal use, but please do not use my designs to submit work for publication or contests.
For more Stampin' Up!® information, go to www.stampinup.com or www.dianneshiozaki.stampinup.net

Friday, December 26, 2008

Buzzin.....with new Stamps!


Can you tell that Spring is coming? NO? not yet? Well, yesterday was Christmas, and we just started Winter..but, I bet there are some of you wanting the warmer weather to get here FAST!
In California, we're freezing. (ok, not freezing, but it is really really cold by our standards!) We were just wearing shorts and t shirts just a couple of weeks ago, complaining about the 85 degree weather and not getting any rain!
So, this card is in celebration of Spring.
Period.
as the card says...."have a honey of a day!"
It is stamped in black on More mustard, and cut out, and then placed on Sahara sand. I used Prisma color pencils (don't they color in GREAT!)

All stamps, paper and inks used are © Stampin' Up!® All images, designs and words are copyright of Dianne Shiozaki unless otherwise stated. Feel free to copy any design for your own personal use, but please do not use my designs to submit work for publication or contests.
For more Stampin' Up!® information, go to www.stampinup.com or www.dianneshiozaki.stampinup.net

Thursday, December 25, 2008

Love you much.....

Merry Christmas!

And there were shepherds living out in the fiedls nearby, keeping watch over their flocks at night. An angel of the Lord appeared to them, and the glory of the Lord shone around them, and they were terrified. But the angel said to them, "Do not be afraid. I bring you good news of great joy that will be for all the people. Today in the town of David a savior has been born to you: he is Christ the Lord. This will be a sign to you: you will find a baby wrapped in cloths and lying in a manger."

"Glory to God in the highest, and on earth peace to men on who his favor rests."

Luke 2:8-14


I was having fun with this set...
So, just goofin' around, I decided to 'color' in the letters with the Mono glue and then add the Red micro beads to the letters. I also use the green micro beads which a few got stuck in the red area (sigh) but, I think it still has potential. I will definitely do this again, but maybe let it dry more thoroughly so it won't stick....but, you know...how you get so impatient that you almost can't wait for things to set.....

So, try this one out...!!!
You'll reallly love how it looks! (sparkly!)


Have a blessed day!

All stamps, paper and inks used are © Stampin' Up!® All images, designs and words are copyright of Dianne Shiozaki unless otherwise stated. Feel free to copy any design for your own personal use, but please do not use my designs to submit work for publication or contests.
For more Stampin' Up!® information, go to www.stampinup.com or www.dianneshiozaki.stampinup.net

Wednesday, December 24, 2008

Love you much.....!!!


This is a suspension card...I don't really know what to call it, but it The heart is suspended on the ribbon, and when this folds together, it will lay flat!

It is stamped in Riding Hood Red, on Pink Pirouette. I love the new papers that coordinate with this set!

They are so cute like Valentine's candy!

I added a little border to the edge using the Riding Hood Red cardstock and the Scallop edge punch. The punched heart also is added to the center of the O in LOVE using the 3 heart punch!
Valentine's Day Bundle : 115409 41.48
Available until Jan 31 2009. Get a jump on your valentine's day stamping and take advantage of a NEW set coming up in the January Spring Summer Catalog and Idea book!


All stamps, paper and inks used are © Stampin' Up!® All images, designs and words are copyright of Dianne Shiozaki unless otherwise stated. Feel free to copy any design for your own personal use, but please do not use my designs to submit work for publication or contests.
For more Stampin' Up!® information, go to www.stampinup.com or www.dianneshiozaki.stampinup.net

Tuesday, December 23, 2008

Getting Ready for LOVE in December!

Today is the LAST day for FREE SHIPPING! Order today to get the best DEAL! You can order this Valentines Bundle from today to the end of January though!


Put some {Hearts} into your VALENTINES!


The Love you Much Promotion starts today! December 23 to January 31, 2009


Get your Valentines a Big Start and stamp your love out now! This cute set is being offered in the sweet bundle at 20% off!

Get ready for Valentine's Day with the exclusive Love You Much Bundle (item 115405).

The Love You Much Bundle includes the following:
Description Retail Value
Love You Much stamp set $25.95
Candy Lane Designer Series paper (Close to Cocoa, Pink Pirouette, Riding Hood Red, Very Vanilla) $9.95
Heart To Heart punch $15.95
(the PUNCH matches the stamp set of 3 hearts!)

Bundle Retail Value $51.85
Love You Much Bundle $41.48
(20% off; item 115405)


The products featured in the Love You Much Bundle are sneak peeks from our Spring-Summer 2009 Idea Book & Catalog. These products will continue to be available during the Spring-Summer catalog period, but without the special promotional pricing. Before the launch of the new catalog on January 19, the only way to purchase these products is through the Love You Much Bundle. After January 19, the individual items will be available for sale, but promotional pricing will only be extended using the bundle item number. No limit on the promotion, you can buy as many as you like for the promotional price!


xoxoxoxoxoxoxoxoxox


Merry Christmas! Have a Blessed Christmas!


All stamps, paper and inks used are © Stampin' Up!® All images, designs and words are copyright of Dianne Shiozaki unless otherwise stated. Feel free to copy any design for your own personal use, but please do not use my designs to submit work for publication or contests.
For more Stampin' Up!® information, go to www.stampinup.com or www.dianneshiozaki.stampinup.net

Monday, December 22, 2008

Who Started this Christmas Stuff?

My aunt sent me this and I don't usually post these message things to my blog, I really felt that it was something that had a great message. I hope that we all have a great Christmas. With the economy and the hardships that might come in the future, I know I have set myself a more simple goal for this next year to get through. To be a servant for God -to serve and help others, and to pass the message on.
Who Started this Christmas Stuff?

A woman was out Christmas shopping with her two children.

After many hours of looking at row after row of toys and everything else imaginable; and after hours of hearing both her children asking for everything they saw on those many shelves, she finally made it to the elevator with her two kids.She was feeling what so many of us feel during the holiday season time of the year - overwhelming pressure to go to every party, every housewarming, taste all the holiday food and treats, getting that perfect gift for every single person on our shopping list, making sure we don't forget anyone on our card list, and the pressure of making sure we respond to everyone who sent us a card.

Finally the elevator doors opened, and there was already a crowd in the car. She pushed her way into the car and dragged her two kids in with her and all the bags of stuff. When the doors closed, she couldn't take it anymore and she stated, "Whoever started this whole Christmas thing should be found, strung up and shot."

From the back of the car, everyone heard a quiet, calm voice respond, "Don't worry, we already crucified Him."For the rest of the trip down in the elevator, it was so quiet you could have heard a pin drop. This year, don't forget to keep "the One who started this whole Christmas thing" in your every thought, deed, purchase and words. If we all did it, just think of how different this whole world would be.


Merry Christmas!
Tomorrow is the last day for 10% off your order. Please be sure to check my blog for the new special and take advantage of it! You won't want to miss the new punch!

All stamps, paper and inks used are © Stampin' Up!® All images, designs and words are copyright of Dianne Shiozaki unless otherwise stated. Feel free to copy any design for your own personal use, but please do not use my designs to submit work for publication or contests.
For more Stampin' Up!® information, go to www.stampinup.com or www.dianneshiozaki.stampinup.net

Sunday, December 21, 2008

Punch Pals Step Card

I got this card idea from Sharon, who made a wonderful sample! She had it posted on Sudsol, and I wanted to give my customers a fun card to make today!

Today I had a FREE day of stamping and gifts....so, we made this step card. I first had them stamp all the elements. I stamped the Red Scallop circle and the blue snowflake in the center, and embossed that....but they had to punch it out. The rest had to be stamped and colored and cut out!


I followed Sharon's sample almost exactly, except I did change a few things by stamping white craft ink on the back Top Note, and stamped a few punched out snowflakes as well.
Busy card, but it looked so cool, I had to share this with my customers today!


Stay Tune to TUESDAY...and be sure to email me asap if you would like to order and get FREE SHIPPING!
The FREE Shipping ends TUESDAY!
But, TUESDAY something new is coming! Stay tuned

All stamps, paper and inks used are © Stampin' Up!® All images, designs and words are copyright of Dianne Shiozaki unless otherwise stated. Feel free to copy any design for your own personal use, but please do not use my designs to submit work for publication or contests.
For more Stampin' Up!® information, go to www.stampinup.com or www.dianneshiozaki.stampinup.net

Tuesday, December 16, 2008

Gift Giving - Organized Christmas


These cards were downloaded from a website, and then mounted on Riding Hood Red and Kiwi Kiss cardstock...and then they will be added to the planner I made yesterday. They come FREE from a website called http://www.organizedchristmas.com/
You can get lots of great ideas from this website from menu planning, to calendars, to gift giving!
I will also decorate them more with some of the Adhesive die cuts from the "I Wish" Simply Scrappin'. I used the papers to decorate the composition book.
*************************************************************************
I just had to share this one..I knitted this cute little sock, and put it on a key chain!


I will have to see what kind of decorative stamping I can add to this one!


hmm....but as you can see, I put it next to my Stampin' Up! scissors, =will it make a cute scissor charm?
you can get more details on my


All stamps, paper and inks used are © Stampin' Up!® All images, designs and words are copyright of Dianne Shiozaki unless otherwise stated. Feel free to copy any design for your own personal use, but please do not use my designs to submit work for publication or contests.
For more Stampin' Up!® information, go to www.stampinup.com or www.dianneshiozaki.stampinup.net

Monday, December 15, 2008

Gift Giving -- I Wish Planner/Journal


I actually was working on a project that I should've been working on earlier, but...I was really busy with working on Christmas cards, stamp a stacks, and classes....so this one came to me from one of my customers. She suggested that we do this...now, it is late for this year, but...I can give it as a gift, right?

It can be used as a holiday planner, or maybe as a holiday gift diary, or journal......


I love the rich look of the papers, with the Chocolate Chip and Riding Hood Red, and the Kiwi Kiss. I had an extra Brushed Gold Snowflake from my Christmas cards, that I used to accent the cover. The Chipboard Star is from the Country Living kit, and the stamp is also from the kit. I punched the circle out with the 1 3/4" circle punch. The scallop circle is from the Sizzix die, in the largest circle and stamped with the snowflakes from the Country Living kit.

I still need to add more to the cover...nothing has been glued down yet....., but as I was making the book, I added 2 ribbon book marks. I thought as a decorative way to finish off the ends was to add these silver brads...(i wish they were gold!)....but, I had to do with Silver....

To add them, I turned the edge of the ribbon over, and punched a hole, and threaded the brad through the hole. It works, and I think I might try to turn the points over so they won't poke out. I added a little 'fray check' to the ends too, so they wouldn't unravel.


**my cute little dog was in surgery today. She had a cyst that ruptured, and she needed surgery to have it repaired...just what we wanted to spend $ on before Christmas! YIKES! She made it out with no problem even with her heart murmur, which they said was a complication!
I brought her home with a cute little purple and white bandage on her. She was so sweet, sitting in her basket the whole way home in the car!


All stamps, paper and inks used are © Stampin' Up!® All images, designs and words are copyright of Dianne Shiozaki unless otherwise stated. Feel free to copy any design for your own personal use, but please do not use my designs to submit work for publication or contests.
For more Stampin' Up!® information, go to www.stampinup.com or www.dianneshiozaki.stampinup.net
Sunday, December 14, 2008

More Sweet Gift Giving!

I hope you like this Candycane Cocoa...I guess I should probably try some. Actually, this package had a little hole in it, and wow! DID IT SMELL GOOD! lol I have another box which is perfect for the 6x3 cards, that I bought from http://www.clearbags.com/. the size of the box is approx 6 7/8 x 3 3/4" (for the envelopes too)


Cut your pieces of cardstock so that they will fit inside the box. The width is smaller than the box size, so that you can actually fit it in. The box is measured according to the outside measurements, so it can be off by 1/4". It is probably better to be a little smaller than too tight to fit inside easily.
I scored the cardstock so that it formed a box at the bottom (1/2" gusset).
The flap portion is 2 1/2", 1/2" and then 1/2" (3 1/2" total x 3 5/8")


The flap section is where the cocoa mix will sit, so I used the small oval punch to form the opening. I slid the punch across all the way to make the opening. Leave at least 1/4" on the side so it will hold it down. Attach this piece to the other Riding Hood Red piece and make the pocket.


This is what it will look like after you punch it all the way across. I added the decorative papers


To embellish the front, I added the Scallop punched, felt flurries (with glue) and then the Circles. I used the glue instead of dimensionals, since the felt acts like a dimensional.


This is what it looks like before you place it in the plastic box!


After it is in the box, add the candy canes for a more festive look!

It's a wonderful life...for a dog..
do you see how she's suffering??? lol
ahh...what a way to go!
Dozens of stamp sets from the Fall-Winter 2008 Idea Book & Catalog are retiring. Now's the last chance for your customers to get them--these sets are only available through January 18, 2009. And they're 10 percent off from December 9-23, so don't wait to order!

All stamps, paper and inks used are © Stampin' Up!® All images, designs and words are copyright of Dianne Shiozaki unless otherwise stated. Feel free to copy any design for your own personal use, but please do not use my designs to submit work for publication or contests.
For more Stampin' Up!® information, go to www.stampinup.com or
www.dianneshiozaki.stampinup.net

Pinterest

Follow Me on Pinterest

Stampin Up Bloomin Bouquet

Copyright


All stamps, paper and inks used are © Stampin' Up! ® unless otherwise stated. All images, designs and words are copyright of Dianne Shiozaki, unless otherwise stated.
THIS is my personal blog, and the contents is my sole responsibility as an independent Stampin' Up! demonstrator and the use of and content of the classes, services, personal opinions or products offered on my personal blog is not endorsed by Stampin' Up!
~~~~~~~~~~~~~~~~~~~~~~~~~~~~~~~~~~~~~~~~
Feel free to copy any design for your own personal use, but please do not use my designs to submit work for publication or contests. I give credit to whose work I case, so please do the same. Plus, it is just not nice to take credit when you were not the one to think of the idea!


Daily Bible Verse

Quotes by Dr. Suess