Thursday, August 30, 2007

World Card Making Day Coming up!

http://www.worldcardmakingday.com/
This card is from Patricia Weitzel who made fantastic cards! She was in a swap with other stampers and shared them with the group! I think she had a fantastic gallery to share!

Coming up....WORLD CARD MAKING DAY is October 6-8
This is a weekend, we will try to make cards for ourselves to share with others...and I also want to make cards for the troops over seas! One of my downline has a husband that is in Korea right now, and I know she misses him terribly, but I also know there are thousands of soldiers that are in Iraq, Afganistan, and other nations over the world. So, let's get together ...check my calendar of events on my website to see when I have planned my event..and let's get STAMPING!!!!! We can "STAMPIN' UP!" and share our love of stamps with everyone!


I will have some fun cards to make with the Simply Sent kits and other kits that I love to make up for you, when you attend my classes! I pre-cut everything, and try to make each card with fun technqiues and PAIN-less as possible! Even so easy a NON stamper CAN DO IT!!!

Try it....you'll like it!


Starting September 1st.....YOU can now order from the HOLIDAY MINI Catalog!
to see the Mini Catalog, you can view it from this link....
http://www.stampinup.com/us/documents/Holiday_Mini_07_US.pdf


again..Happy Stamping!

Wednesday, August 29, 2007

Stampin Sympathy and Get Well

I have more cards that need to be sent out..

and this one is for a get well card.....
She is having the surgery tomorrow..and I pray that God will heal and make her better ......


I dyed the flowers using Apricot and Groovy Guava. Then I added the Rhinestone brad to the center and attached it to the card.


This is sympathy cards. I didn't want them to be too somber, but somewhat cheerful and yet quiet. They are monotone in green, using Certainly Celery, and Wild Wasabi. Nice combination, and very simple


Sunday, August 26, 2007

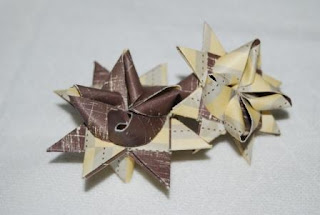
Another Paper Star

http://www.geocities.com/mmukhopadhyay/creation/star.html
Tori has a friend who makes a lot of these stars...she had a kit from a Japanese Market that had strips of paper to make these teeny little stars...and I do mean teeny. They are smaller than a penny if you do them right. But, they are so cute! She had them in assorted pastel colors,and this site shows you how to do them. If you use really cute or pretty papers, they can be added to your cards or scrapbook pages for a fun 3D effect!

Saturday, August 25, 2007

3D Stars


Okay, I followed the instructions..and they are not easy, but they are do-able! If you twist the paper, carefully, and then tuck it into the strips that cross over, you can figure it out!


Try it...4 strips. These are 1/2" wide x 12". I cut off about 3" or more....to make them.


3 D Stars

I found this great website that shows how to make stars out of paper! I love the possibilities of this site, and they have kits for sale too! http://highhopes.com/3dstar.html You can also email James at e-mail madandmav@aol.com The stars are called Moravian Pensylvanian German stars. I couldn't get a photo of them, but, you can get the idea that the premade bows you get at Christmas, well this is like that, but YOU make it in your own colors and papers!

I will try working with a few strips this weekend...and maybe you'll see some of the wonderful possibilities of this craft with Stamping!

Wednesday, August 22, 2007

August 25 Cards...4 cards for this weekend!

Origami folding is fun, using the new papers. This is in miniature, 3" note cards and envelopes to make a cute bridal gift enclosure, or new mom card, or maybe let's go shopping card!


Using the 3 for you punch, which is the punch a bunch promotion....buy this punch and stamps, plus the ink spots and you will get gift cards for free! (value 12.95)


Fun in origami making...this is a cup, which can actually hold water for a short time..(lol) if you are really thirsty, I would suggest getting a plastic cup....but, this is a cute pocket to hold an invitation to a social event! This is in miniature, using a 6" cardstock folded, after being stamped on both sides.


This window 3D card is probably the great finisher for this day's event! I think that you can adapt this into a holiday card (which someone kindly sent me a sample...) but, I used this to celebrate Pirates...!
is it your birthday? or peeking in to say hello!?

Sunday, August 19, 2007

Cruising...Stampin' Up! Style

Each year...Stampin' UP! has a cruise for achievers....so far, I haven't been on a cruise yet..but, I hope that someday, I might be!

This is a promotional flyer that they sent out to each demonstrator.....


The flyer has the goals that you need to achieve this dream of going to a wonderful paradise ....in 2009, it will be Hawai'i!


To achieve the cruise, you need to have sales, and also recruits, as well as promotions within your downline. This hasn't been easy for me, but there are alot of people who have been able to go to the cruise........maybe someday?


Maybe you might want to sign up for my downline, and help me earn cruise...and you too!.....


Cruisin...Stampin Up! part 2

The flyer has 2 parts....first is the photos to entice you to want to achieve the goal...

and then it has a interactive part...where you can make your own shirt to go on the cruise!


so, I followed the directions. First, you fold the sides into the center. You want to make sure the dots and the small emblem are on the outside, and not folded inside.


Fold it in half and you will see the buttons and the pocket

Then fold the 'sleeves' by folding the dotted lines out at an angle. They will make the sleeves once you fold it in 1/2


Then you fold the collar down, and again..voila! you have a shirt to cruise!


Get Well card


A friend who is ill, needed to have a card sent to her...she has a mysterious illness that no one seems to know what is wrong with her. She's fine one minute and then the next, she has pain all over her body where she can't seem to move.

So, I needed to make a card. This is using versamark ink, clear embossing powder and classic ink colors on vanilla cardstock. I used classic colors in yo yo yellow, summer sun, pumpkin pie and always artichoke to color in this card. I think I am moving out of my chocolate stage and now into fall colors....

I am also sending prayers to go along with it so that the doctors will have the wisdom to treat her....

ps. It is my dad's birthday...he's 71...I guess I better get off the computer and wish him a happy birthday!

Thursday, August 16, 2007

Quick Cards


This is a quickie card you can do -SIMPLE and FAST!
I stamped using the FAST & FUN Set, and didn't stamp the words. I used the porcupine stamp in Basic Black ink on Creamy Caramel cardstock. I sponged the corners, and using the Classic Ink and Blender pen, I colored in the image. I then mounted it on chocolate Chip cardstock and onto Close to Cocoa and Chocolate Chip cardstock. The ribbon is the Double Stitched Purely Pomegranate. The white pen highlights some of the image, but, I just love to play with it...maybe alittle too much?
Anyways, the inside is signed using the White Gel Pen, and it works just beautifully! Have you tried the White Gel Pen that Stampin' Up! sells? If not, then YOU SHOULD!!!
Happy Stamping!

Wednesday, August 15, 2007

Back to Stamping Again...

Well, after spending a weekend in Las Vegas for a basketball tournament, and having a fun time driving home in over 100 degree heat (NOT FUN!)...the only thing fun was driving a Toyota Prius! We did have fun driving the car, but I do have to say that Tori knows more about the car than I do! She found it easy to start..(even though she can't drive yet) I was home and then was sick, I think because of not feeling well in Las Vegas, and then getting heat sick or dehydration..anyways..it took me until today (Wednesday) to feel better....ugh..not sure what i have, or when I will actually feel back to normal, but I HOPE it is soon!


Sad to say, there have been some passings of friend's parents that have come along, and I needed to make a sympathy card. One friend's dad passed away, and so I thought to send this card to him and his family. My upline's upline's mom passed away too, so I will make one alittle more feminine for her....


It is not as easy to make male cards, or sympathy cards, and so this is a challenge for me..It is easier to make fun happy sunshine, life is good cards...but, when God brings us joy, He also brings us challenge to make us grow.....and when friends are going through grieving, even if it was somewhat expected, it still makes our hearts sad to know that they are suffering from loss.


This is for a friend, Denise who lives in Las Vegas, who took us out to dinner.....

Tuesday, August 14, 2007

Colored Brads?

http://ckmedia.a.mms.mavenapps.net/mms/rt/1/site/ckmedia-pub01-live/current/launch.html?maven_playerId=embededplayer&maven_referralPlaylistId=153ef8399c1bfb296e0cbc1688d2bc67f9775e90&maven_referralObject=338632596

Believe it or not, I find things all over the internet... This tutorial is from QVC and from Creating Keepsakes....You can color your brads if you're in a pinch and you have some Acrylic Paint that matches your project!

Try it....it might be messy...

one thing I thought of...use a plastic folder instead of punching paper...you can save paper, and time by having it pre-punched, and you can also wipe it down and re-use it..and it might make the brad not stick as much after being painted!

Wednesday, August 8, 2007

Stampin' Around Cartridge Storage

I store all my Stampin' Around cartridges in a HOT WHEELS Car storage container. They used to sell them at Walmart or Target but i haven't seen them there anymore. This one is from ebay, and it is listed as a HOT WHEELS storage container for 48 cars...it is double sided and has several compartments for storing the cartridges. You can also store the JUMBO cartridges in each compartment so, if you get 1 box, you will be able to store 48 reg cartridges, and 24 Jumbo cartridges or 96 reg cartridges or 48 JUMBO cartridges.

You might need to get 2 of them! (I have 2)

I took some photos of what it looks like, but I do have each cartridge labeled.

Happy stamping!

Saturday, August 4, 2007

CHERISH Prayer book


I decided to do a scrapbook in a sense, but actually, it can be used for anything. I wanted to try to use the new BOHO style and yet, I am in LoVe with the new Punches! Oh my goodness....I think Stampin' Up! needs to make more punches that coordinate with the stamp sets...so I don't have to cut things OUT! Wouldn't that be so cool!
I have written to Demonstrator Services...and suggested that they make more punches or influence the manufacturer...or make stamps to go with the punches! (whichever is easier!)

Each of the pages are held together using the Ring binders...You can get them at STAPLES.

I also used a few sets to make this book along with a sponge and Close to Cocoa and Chocolate Chip Classic Ink

and the Stitched ribbons...well, they are the bomb! :)

Holiday Mini Collection preview!

http://www.stampinup.com/us/documents/Holiday_Mini_07_US.pdf
This is the NEW Holiday MINI Catalog Collection! WOW..it is fantastic! It won't start until September 1st, but you can preview it here! The colors are rich, and even though I am not as thrilled with the papers, I Love the Chipboard Garland! I think it would be great to make one for YOUR Holiday tree, or to hang over a doorway! You can make some really fun projects with the new stamps, and do your Holiday cards for your friends and family.......

There are quickie gift tags you can stamp for your last minute gift wrapping and great wrapping papers. (the papers are not available for me to pre-order until August 15th, because of quality control, but I hope to get them asap!)

**NOTE**
I have to add one thing!!! I just got in my order, and ....all the stamps in the mini catalog are more expensive..BUT!!! THEY ARE ALL DIE CUT! No cutting is involved of the rubber unless you want to trim more! All you have to do is punch out, peel and STICK! and then STAMP!!!

GOTTA CHECK IT OUT! I will post more about it later!

Friday, August 3, 2007

New Technique Booklet


Have you ever looked at Stampin' Up!'s Technique booklet? It has changed over the years, and I can testify to the changes I have seen over the years....however, I think this one is really a nice booklet!
It has Ideas for stamping, and techniques to try...
So, if you are new to stamping, or you're almost a professional...you can see some great ideas, and ways to use Stampin' Up! stamps in your cardmaking and scrapbooking!
Place an order, and this will automatically come in your order..!!!
If you don't get one, ask me for one! I have one that you can see, and as soon as I get a few more, I will be sure to send them along to you!

Sew Mini On sale at HANCOCK Fabrics Online!


Hancock Fabrics JANOME Sew MINI on Sale this week,
www.hancockfabrics.com


and to get shipping, use this code....
Free shipping code
EFSZWD
August 3rd and 4th
thank you for the code Cambria !

Wednesday, August 1, 2007

Pick a Petal


I scoped this one from Sudsol..some clever stamper made it using her punches (the small 1/8" punch) and the Pick a Petal set...I stamped it on white and yoyo yellow...in black ink.

Mounted on white cardstock, the punched out black cardstock looks like polka dots and layered over the white so it shows through!

Trimmed with the yellow grosgrain ribbon, this card has a little snap!

but, of course, you can add your own snap! What can you suggest to make it snap more???

Sewing on Cards

I finally am going to teach a class on sewing on cards! I got this sewing machine from Hancock Fabrics online, (thank you Cambria for the tips!)

1. First of all, to sew, you need a sewing machine. It doesn't have to be a good one, but one that can sew through layers of cardstock. The ones they sell at the local craft stores, might not work. I used to have a cheap one, and it was not a good, so I sold it. (I think it was about 19.00, plus a discount coupon from Michael's)

This one, is not bad. I would use my Bernina, but to sew on a card, after spending way too much on my lovely Bernina, I would not want to tell my sewing machine guy (Scott) that I am using that on paper..so this one is a good one for less than 40.00, I can now sew on paper with too much stress. Of course, if you have a great machine at home, and not using it for more than just your basic sewing, you can use your home machine! I won't tell!!!
2 The ZigZag feature works great on this machine. I had a harder time using the straight stitch because you tend to want it to go straight (duh) and it will make it look more obvious if you are not purrr fect! (see my backpack card...)
*NOTE: Change your sewing machine needle if the needle sounds like it is punching through the cardstock. You would not want to break a needle because it is dull. You should change your needle after every few cards you make with the machine!


The Green strip of cardstock: I didn't have any polka dotted green cardstock...so...I PUNCHED it using the 1/8" punch..yes, they are hand punched and placed over a white strip of cardstock! ha ha!


The inspiration for this card, is from Cambria Turnbow!


She has such fantastic color and design ideas! I changed a few things because I don't have the set, and I wanted to use what I had already....I don't want to get too many stamps this year, since we have a mini catalog coming out in September and a NEW catalog coming out in January! The new papers are just fantastic! I love the bright and cheery colors!


3 To make the small flower, I used the Punch a Bunch Kit, and stamped a single flower, and then using the punch, cut out one flower. I lined it up by turning the punch over, and punching out just the stamped flower! Then I used a small hole punch to cut the center, added a brad, and attached it to the card that goes inside the pocket with a glue dot. (don't you just love them glue dots!)


4 The tab was punched out with Green Galore, and I stamped it with the "friend" in the punch kit.
5 The scallop punch was done in YoYo Yellow, and I applied 3 dimensionals to the back.
It is stamped using the flower from the Pick a Petal set, and I used a small punched circle using a hand held punch (1/4" circle) in YoYo Yellow. It was stamped in Real Red on Whisper white cardstock, punched out using a 1 1/4" circle and then used a 1 5/8" circle punch in Green Galore to be mounted over the scallop punch in YoYo Yellow.
Voila! you're all done!

AND the WINNER is...

The winner is ....Valerie Mendenhall! In July, I had posted that if you made a comment to my blog, I would draw a winner of a prize! Valerie wins the Card Candy, and I hope she can find some creative use for them! :)

For August.....Post a comment to my blog in the MONTH of AUGUST for the month of AUGUST .....and win a special kit! This will be a special kit, that I am trying to put together still, so I don't have any photos yet...but, it will be a fun kit with supplies to make a great gift for you or someone special!

Make a card...tonight for someone special!
tomorrow is my birthday..heh heh!

Pinterest

Follow Me on Pinterest

Stampin Up Bloomin Bouquet

Copyright


All stamps, paper and inks used are © Stampin' Up! ® unless otherwise stated. All images, designs and words are copyright of Dianne Shiozaki, unless otherwise stated.
THIS is my personal blog, and the contents is my sole responsibility as an independent Stampin' Up! demonstrator and the use of and content of the classes, services, personal opinions or products offered on my personal blog is not endorsed by Stampin' Up!
~~~~~~~~~~~~~~~~~~~~~~~~~~~~~~~~~~~~~~~~
Feel free to copy any design for your own personal use, but please do not use my designs to submit work for publication or contests. I give credit to whose work I case, so please do the same. Plus, it is just not nice to take credit when you were not the one to think of the idea!


Daily Bible Verse

Quotes by Dr. Suess